
TRAINING BIBS
In this article, I describe techniques and training programs for the development of the pectoral muscles.
How do I grow my bibs?
I have always had difficulty growing my bibs and this worry in the past has led me to want to manipulate my workouts in the most extreme ways, inserting huge quantities of exercises (from crosses with dumbbells to pullovers).
I increased the volume of work, reduced the recovery time, changed the provibol frequently… All to try to build muscle mass, but to no avail: at the end of the training the ephemeral pumping vanished.
This article is divided into four major chapters:
1- THE FUNCTION OF
THE BIBS
2- TRAINING BIBS FOR HYPERTROPHIC DEVELOPMENT 3- SCAPULAR AND THORACIC MOBILITY
4- TRAINING THE BORS TO DEVELOP THE BIBS
TRAINING BREASTPLATES
THE FUNCTION OF THE MUSCLE
The pectoralis major muscle flexes (lifts the humerus), extends (lowers the humerus), adducts the humerus horizontally, put it forward and rotates the humerus internally (between the wheels). Using the humerus as a fixed point, lift the trunk. The pectoralis major acts also in deep inspiration, dilating the chest when the limb is fixed.
This is what Wikipedia explains to us about the bibs, but is it enough to know this to have clear ideas on how to train them?
Obviously not.
TODAY NO BOOKS FROM EXHAUSTIVE EXPLANATIONS ON THE TECHNIQUE which is the fundamental point in seeing a muscle grow.
It is not enough to create a situation of muscle elongation and shortening to stimulate a muscle, on the contrary, often this leads to dysfunction of the joint making its movement cumbersome, as well as dangerous.
So what is the real function of the pectorals in moving the weights?
There is an effective reason for movement for muscle mass development that is intrinsic in our DNA. PUSH, MOVE, MOVE objects.
The bibs act as powerful support elastics that allow us to push loads effectively, so to learn how to use them we must know a gesture, train that gesture and derive a skill from it.
By inserting other single-joint exercises we will fill the technical skills and chisel the muscle, even knowing that every exercise that completes a fundamental gesture remains the son of that original movement and the logic that is its matrix, without ever being completely upset.

PECTORAL EXERCISES
What is usually seen in the gym is very harmful stretching with overloads, a constant search for muscle burning, creating the most unnatural positions just to feel that the muscles are working.
For the bibs, we see the most absurd and useless movements: shoulders that work in complete dysfunction only to extreme the shortening of the bibs.
But can this really be useful for growth?
Working like this allows only 20% of the expression of our genetic potential.
Those who are neophytes will never improve if they immediately focus on the muscle during a movement. For those who have not gained control over that movement, thinking about the muscle that stretches and shortens becomes limiting and counterproductive.
Some strong subjects have managed to make movements autonomously effective by benefiting from the focus on the muscle, but we are still talking about the attention that cannot be generalized.
Anyone who wants to become strong must take a path, making movements with overloads effective.
In this article, I want to describe different exercises that we can use to build the pectoral muscles taking into consideration that muscle-building must always go in line with the proportions and symmetrical growth of each district.
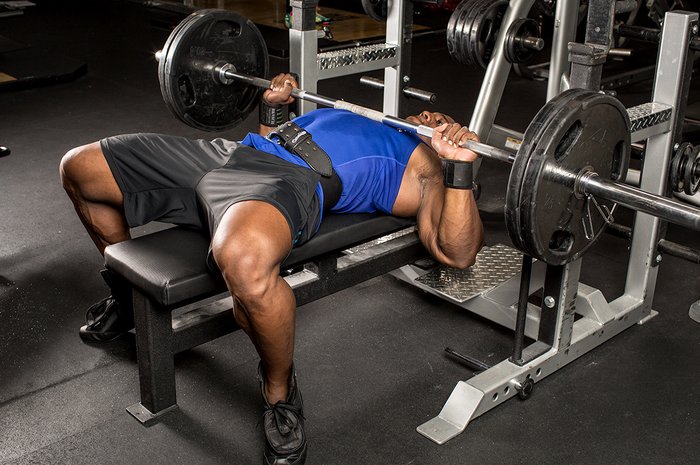
THE FLAT BENCH
The BIG for the growth of the pectoral muscles, capable of building a complete and perfectly distributed ribcage in its forms.
It is essential to take control of the barbell at every stage of the lift, finding the best push solutions and understanding how to set your body in order to be in the right push position.
The more we will be able to generate strength in this exercise, the closer we will get to our genetic potential for growth and activation.
Here it becomes necessary to start from an accurate technical approach that over time can evolve into an effective movement.
It often happens that many beginners do not have the necessary coordination and joint mobility skills to perform a flat bench up to the chest, so you can opt for a partial execution from the pins, in which the barbell is unloaded in a more suitable position. thrust, eliminating the most complex part to manage, which will be reintroduced only later.
But in this article I want to give precedence to other movements, being the topic «Panca Piana» already treated in a more than exhaustive way in numerous other articles, of which I leave you a small list:
THRUST WITH HANDLEBARS
We will initially change the angle of the backrest according to the structure and mobility of the subject. the inclination of the bench should not be changed randomly, only for the purpose of varying the work surface, but must be decided on the basis of the subject’s ability to push, evaluating the point where his joints respond better to the load of the dumbbells, scrolling physiologically.
To learn this exercise well, we must take into account that the rules change slightly compared to the execution of the Panca Piana. First of all, it becomes fundamental to maintain a good balance of the dumbbells on the hand, trying to focus on them without changing their support.
The rom must initially be partial, we go down to the point where the perception of balance on both hands remains identical.
To learn the pushes, I elaborated on an evolution that we can fit within the annual programming.
It starts from the sensitization of the Contact Point only, keeping the dumbbells in identical support on the hands, making them go up and down every little, for an extremely reduced rom.
We will carry out this variant of pushes for the first 6 weeks:
- Pushes with dumbbells partial descent, stop 5 ″ and push 5 ″ without extending the elbow 5 repetitions x 5 series
The absence of the articular block (in extension of the elbow) allows us to maintain a correct thrust line for each repetition. Once we have gained greater confidence in the gesture, we can make it more intuitive, keeping only a strategic stop halfway.
We will run this variant for another 4 weeks:
- Dumbbell thrusts, 2 ″ stop: 6/8 reps x 4 sets
Once we have obtained a good level of experience we can work with ramping, also using RPE :
- Dumbbell thrusts. stationary 1 ″: x6 @ 8
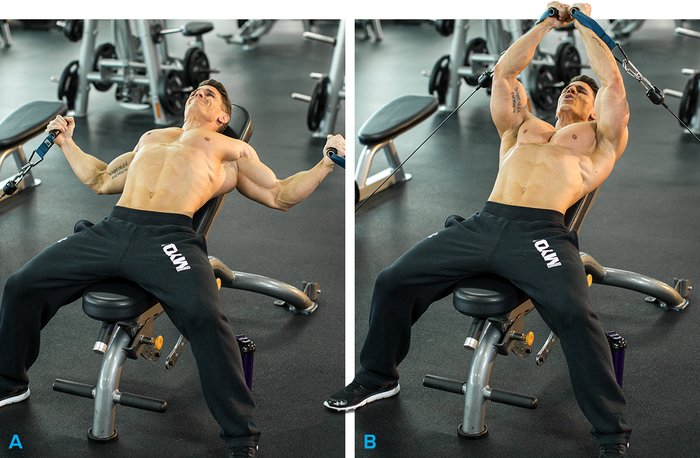
CROSSES WITH HANDLEBARS
This complement becomes very useful for all those who put the shoulder in front during the push. It allows us to work the bibs more precisely.
To perform it correctly, the arms, i.e. wrist and elbow must remain immobile while we only use the mobility of the chest throughout the movement. The focus must be kept on the palms of the hand with the dumbbells in perfect balance and always in the push position.
To understand the best position we can initially perform it on the pectoral machine, which allows us a better focus on the hand that generates pressure constantly.
PUSH-UPS
Often considered a trivial exercise, it is underestimated, in reality, what I found in the past about myself and many other subjects was a clear deficiency in the ability to generate strength and stimulate the muscle. I consider this exercise one of the most useful to better interpret the concept of THRUST.
By learning the push-ups well, we will be able to activate the pectoral muscles and all the stabilizing muscles.
I have developed a progression for this exercise that begins with a slow and simplified movement and ends with the learning of an intuitive and effective movement.
What I find most fascinating in the method of learning push-ups is the use of Contact Points as a system for calibrating balance and control over external resistance.
By maturing the right movement consciousness we can create absolutely effective gestures, cheeky and well received by the body.
In push-ups learning the Contact Point becomes extremely interesting to understand how to align the joints to calibrate the push line.
Let’s start with the basics.
KNEE BENDS — PHASE 1
After setting the subject in the best position, gaze projected just above the line of the hands.
The focus will be on the hand that stops the resistance of the floor, and not on the direct work of the pectoral muscles.
During the descent, we have to unlock the joints by distributing our weight towards the outside of the hand
It is interesting to note that in push-ups and in many other exercises, the change in pressure on the different points of the hand leads the joints to automatically position themselves in the most physiological directions.
In this case, the external hand guides the depression of the scapula, favoring the natural sliding of the humerus with consequent management of the resistance.
The descent will be partial and will see a long isometry, on beginners I tend to extend it up to 10 ″ to allow the nervous system to register the position well, learning well to control the most difficult points.
The ascent requires that the hand sticks completely to the floor, also on the inside, generating full and constant pressure against the floor, with the idea of ​​moving it.
Example of execution in the first 4/6 weeks of technical phase:
- PARTIAL FLEXIONS, controlled descent to half, stop 5/10 ″ rise 5 ″ 3 / 6rip x 4 / 6series
PARTIAL FLEXIONS — PHASE 2
Once you have learned the basics, we bring movement to a greater difficulty by raising the legs and pointing the feet.
We keep partial Roma with the intent of fixing the concept of pushing well on a more intuitive portion of the movement.
The focus remains on the outside of the hand in descent and the whole hand in the ascent, at this point we will have acquired much more fluidity of the gesture and ability to also control the various points of contact in our favor.
A practical example that can be placed within the Neural Enhancement for 4 weeks can be:
- PARTIAL FLEXIONS, stationary 5 ″ climb5 ″ 4rip x 6 / 8series
COMPLETE FLEXIONS — PHASE 3
In the following weeks, having worked a lot with mobility and slow executions, we can try to stretch the rom, reaching the floor with the belly.
Here I recommend keeping a controlled movement, in order to further enhance motor skills making them transferable to other push exercises as well.
In the program, we will place this execution from the 5th week of the PN to the 9th
- COMPLETE FLEXIONS, descent 5 ″ still1 ″ reactive ascent, think of pushing the floor away. 10r x 6 / 10s
INSTINCT FLEXIONS — PHASE 4
I would use this variant in JAW and / or IS (specific hypertrophy) phases. Having fixed, in the previous months, a good technical control of the movement will be used to the advantage of the athlete to give more mechanical and metabolic impact to the series.
If the technical capacity tank is no longer occupied, the force tank can be fully delivered.
I also recommend complementary not to abuse the failure series.
Remember that a natural must always remain alert and responsive enough to trigger SN muscle growth stimulus.
Complementaries are to be used as a powerful muscle finishing tool and coordinative care.
So the failure must remain the spare stimulus of the series, the final blow that can promote muscle growth.
An example to be used in the JAW or IS protocol, could be this:
- INSTINCTIVE FLEXIONS 10 10 10 N (ok, go to muscle failure)
- SLOW FORWARD
- We consider this exercise a fundamental in all respects, the care with which it must be carried out is millimeter, a single trajectory mistake and we will not be able to activate part of the motor muscles of the thrust, especially the clavicular head of the pectoral muscles.
Learning to manage this exercise well will give you great advantages:
- development of the roundness and density of the shoulder-pectoral block ;
- chest thickness ;
- posture optimization.
- Obviously, to obtain advantages, we must maintain the correct joint physiology.
To successfully perform this exercise, you need to spend 10 to 15 minutes of specific chest mobility. I know it may seem excessive for a workout, but it depends on the absolute success of the execution and activation of the bibs.
Among the mobility exercises that I insert are:- Openings with elastic starting from the top 3 series x 5/6 reps
- Lat machine complete descent in 5 ″, stationary 10 ″ 3 series x 2/3 reps
- These exercises will get us used to keeping the ribcage mobile and welded in the optimal position for vertical thrust. By bringing us into a push position, we can synergistically activate a large part of the upper chest area, thus releasing more force.
The programming that I did on Slow Forward has a cyclical basis and rotates over 3 weeks: HEAVY, VOLUME and LIGHT.
SLOW FORWARD, PVL programming, Hypertrophy period Specification:
As specified above, HERE you can find the article on the RPE.
MOBILITY’Different joints cooperate to activate the pectoral muscles, therefore it is good to carry out a detailed motor learning job.
Mobility must be carried out not only before starting with the big, LA PANCA PIANA but at the beginning of each session that involves stimulating the pectoral muscles.
We must absolutely understand the importance of a good job of mobility before each session: the use of the thrust muscles is allowed only if we have excellent chest mobility and a good humerus/scapular rhythm.
OPENINGS WITH ELASTIC
In beginners I divide this movement, only apparently trivial, into three parts:
1) extension of the wrist;
2) traction of the elastic towards the outside, maintaining a balanced perception of pressure on both hands;
3) bring the elastic towards the belly, keeping the pressure on the hands identical and well distributed on the chest.
The final position will see the chest open with the sternum pointing upwards, depressed shoulders, depressed and adducted shoulder blades.
This movement repeated before each bench session is able to transfer greater control of the barbell, giving the right rhythm to the joints.
In the Bench there is a tendency to break the balance during the eccentric phase, creating unnecessary tensions on the trapezius which prevent the joints from sliding properly;
by doing this exercise constantly, we can eliminate this problem over time, creating the most physiological perspective for movement.
FOAM ROLLER
To promote further sternum/scapular mobility, we must frequently use the foam, an instrument that used before each bench session provides the right abdominal relaxation, in addition to the relaxation of the vertebrae and back muscles.
We place the foam on a flat bench, resting it just below the shoulder blades, we maintain that position for about 1 ‘.
Initially, it is normal to feel stiff and not very mobile, we keep the buttocks resting on the bench and relaxed shoulders.
Gradually the yielding of vertebral rigidity will allow us to fully support the neck and shoulders on the back.
FOAM ROLLER + OPENINGS WITH ELASTIC
The foam roller used assiduously allows us a good abdominal stretch and in a subsequent phase, we can add a 3rd mobility exercise that combines foam roller and openings with elastic.
The movement remains identical to that of the openings with elastic carried out on its feet and will directly simulate the progress of the balance.
Thanks to this exercise we learn the optimal thrust line to be transferred to the bench.
FOAM ROLLER + BARBELL
Just before starting a flat bench we can warm up with an empty barbell with the foam roller resting under the shoulder blades, this step is interesting and not negligible since it gives us further positive feedback on the ideal thrust line.
LONGITUDINAL MOBILITY
By bringing the mobility also on the longitudinal plane we will direct the body towards a complete development of the pectoral muscles.
I repeat that it is not enough to move on a more vertical plane (e.g. thrusts on the bench 45 °) to stimulate the upper part of the muscle, but that it becomes necessary to obtain the thoracic mobility necessary to use the clavicular head.
OPENINGS WITH ELASTIC OVER THE HEAD
If in the classic opening we start with the elastic at eye level, here we will start with the elastic above the head, pulling it and always having identical pressure on both hands we will guide it towards the clavicular area. By doing this exercise correctly we will have a perception of the sternum that rises as the elastic approaches it.
Exercises such as Slow Forward and Tractions without the right chest mobility are ineffective for the development of strength and muscle, as well as being harmful to the joints. For this reason, I have opted to give a progression also to the development of these movements.
TRACTIONS
We consider this exercise a fundamental in all respects, therefore its learning must be assisted by programming.
WARNING! I don’t want to talk about vertical tractions in terms of performance (number of repetitions or kg of ballast), nor do I want to consider them for the pure stimulation of the backbones. In this chapter, we deal with the COORDINATIVE advantages offered by this movement.
Performing the tractions correctly allows you to have a more mobile chest that is also able to better manage the thrust.
But, if the price to pay to perform traction is to put the shoulders in front during the movement, or to extend the column to the point of bringing the work on a sagittal plane, it is better to concentrate on rowing movements.
It remains to be specified that this movement can be very useful to fully develop the harmony of the backbone, as well as allowing more mobility for the push on the vertical plane (slow forward) thus filling the gaps on the pectoral’s clavicular area.
TRACTIONS ON LAT MACHINE — PARTIAL ROMA
For the first 4/6 weeks, corresponding to a technical protocol, we will perform only the first half of movement, i.e. the traction of the bar up to eye level.
Our goal will be to minimize the translation on the sagittal plane.
The movement sees two phases:
PHASE 1)
Engagement of the bar, waiting for the right rhythm between the humerus and the scapula without excessively flexing the spine, if we can maintain the right pressure on the hand at this stage we will obtain a depression of the scapula.
PHASE 2)
Meeting the resistance, here the main focus must be kept on the hand that generates constant pressure against the bar, maintaining that type of pressure without changing the position of the column until it reaches eye level, we will activate the Grand Spine physiologically.
A practical example that we can add in the protocol is this:
- Lat machine at eye level, descent in 5 ″: 4/5 reps x 5/6 series
-
TRACTIONS ON LAT MACHINE — COMPLETE ROM
In correspondence with a neural enhancement protocol, we will be able to evaluate, if the right mobility has been reached, to complete the traction movement by filling the path that goes from the height of the eyes to the chest.
Once the bar reaches eye level, the pressure we perceive on the hand increases in intensity.
To manage it correctly, we need to divide the focus from hand to sternum, with the image of the chest gradually being attracted by the pressure of the bar.
In this way we will have completed the rom without putting the shoulders in front, obtaining the maximum activation of the back muscles together with better chest mobility.
We will insert this variant for the first 4 weeks of full ROM:
- Complete lat machine rom, 5 ″ drop: 4/5 reps x 5/6 sets
-
From the 5th to the 8th week of this phase, we make the gesture more intuitive:
- Complete lat machine rom, 1 ″ stop in the chest, fluid movement: 6/8 reps x 4 sets
- One thing that can determine the lack of stimulation on the tractions is often going to failure, in these cases all the vices such as extending excessively with the spine or putting the shoulders in front completely corrupt the movement and consequently the muscle growth.
In every phase of the programming, I refrain from going beyond 8/10 repetitions.
The factor that determines the success of any exercise is the neural component, and I assure you that the most substantial change in shape and muscle density is given by the CNS. The purely mechanical/metabolic work acts more like a muscle finishing and must be circumscribed only at specific times of the year, rarefied compared to training on the nervous system.
In Natural, the thrusting capacity must always be kept medium/high.
TRACTIONS — DEPARTURE 0We work on a rise and with each repetition, we rest and release the tension.
The action must take place exactly as in the work done previously with the lat machine.
We increase the pressure of the hand against the bar until we engage the backbone, maintaining a perception of compactness on the whole body, we increase the pressure against the bar in a constant manner without breaking down the solidity of the body until it reaches the bar at eye level and we slow down the pressure by performing a dead stop.
We insert this variant in the last 5 weeks from the 9th to the 13th
- Traction with start 0 climb 5 ″: 4 reps x 6 sets
- If we have gained the right physiology and the necessary force output we can evolve the movement into complete tractions with a more intuitive gesture.
TRACTION
I believe that a high number of repetitions in the single series are of little use.
We can maintain a fair volume of repetitions by spreading them in several series, in order to make the gesture more activating Until we have become able to pull on the longitudinal plane, I would not go beyond 4/5 repetitions.
Block1 (5-6 weeks):
Free traction / start 0, fluid movement, stop 1 ″: 4 reps x 6 sets
Block 2 (5-6 weeks):
Free traction/start 0, fluid movement, stop 1 ″ at the top: 4 4 4 N (number of repetitions at the athlete’s discretion, ok muscle exhaustion)
Reserve muscle exhaustion only for one series allows us to remain with a very active back and then give a single and large stimulus limited to a single series.
On Natural, the strong stimuli, if contained, are better received at the muscular level, thus maximizing the aesthetic result with more volume and hardness.
Block 3 (5-6 weeks):
Free traction / start 0, fluid movement without stop: 6 8 N
If we can make the Grand Dorsal a powerful elastic band, we can also activate it well by reducing the series, I want to reiterate that everything that happened in the previous phases must have created a certain security and solidity of the movement such as to make it effective with each repetition.
Once the 18 weeks of JAW are over, 4/6 weeks of high-repetition drainage will follow, keeping from 4 / 5rip x 4 / 5series
DORSALS TO ACTIVATE THE BIBS
To have the right synergy between the humerus and the shoulder blades, we must learn to traction.
Without a well developed back, our ability to cushion the negative phase of the push exercises (BENCH, THRUST, BENDS, etc.) is lost.
TECHNIQUE, also here, is the fulcrum for the development of genetic potential.
The specific, because unfortunately, the normality is to see rowers or pulleys full of compensation, excessive extension of the column or interposition of the shoulders at the critical points. The row should be set from scratch, starting from the origins.Each exercise, from Pulley to Seal Row, must see a progression to bring us to express the firepower of the backbone, an element that can then be transferred to a flat bench for the activation of the bibs.
PROGRAMMING
In the technical setting phase (the first phase that EVERYONE should face in the gym), we will see each movement with extremely partial executions, carrying out only the first part of the engagement of the backbones with dead stop at each repetition, in order to get the muscles used to relax before to traction and avoiding all those parasitic tensions that would corrupt the correct muscle functioning.
The exercises we can use are:
- One-arm rowing machine, ascent in 5 ″ 5 reps x 5 sets
-
This exercise will help us solve asymmetries by working unilaterally.
- Pulley starting 0, partial movement up to half, traction in 5 ″ 8/10 reps x 4 sets
-
In the next phase, we learned the movement with a slow and very controlled cadence, we practice the 2nd part of the movement, which sees the maximum pressure and intensity on the part of the back.
To better understand this movement we must work by resting the sternum and using the belly as a support to generate strength. Then we will insert the use of benches and Seal Row.Based on the structural characteristics of the subject, we must change the inclination of the support (bench) to encourage more appropriate learning based on the articular conformation.
The exercises can replace or add to the previous ones:
- Vertical Row machine, complete movement in 5 ″ 5rip x 5 series
-
- Rowing machine on bench 35 °, the complete movement stopped 1 ″ 8rip x 4series (VIDEO)
- Seal Row, ascent in 5 ″ stopped in the middle 3 ″ 4 reps x 6 series (VIDEO)

Having carried out the technical work, we will be able to make the movement more instinctive by using the Seal Row.
SEAL ROW
One of the fundamentals, the main exercise in the complete development of backbones and capable of giving excellent coordination in all traction and pushing exercises.
Having the column completely unloaded, we will fully exploit the strength of the backbones.
Thanks to the months of technique carried out previously, we will be able to focus only on the performance of the Seal Row, also being able to push on the accelerator.
Once the ceiling has been found (the ceiling is valid when the barbell touches the bench) we can program the exercise with the percentages by carrying out a JAW protocol , an extremely effective program that involves very high volume work.
Here’s how this protocol works.
block1
WEEK 70% 10 × 6
SETT2 72% 10 × 5
SETT3 80% 4 × 4
SETT4 74% 10 × 4
SETT5 75% 10 × 3
WEEK 80% 4 × 4
block2
SETT7 80% 6 × 6
SETT8 82% 6 × 5
WEEK 80% 4 × 4
WEEK10 84% 6 × 4
WEEK11 86% 6 × 3
WEEK12 80% 4 × 4
Block3
SETT13 90% 3 × 6
WEEK14 92% 3 × 5
WEEK15 80% 4 × 4
WEEK16 94% 3 × 4
WEEK17 96% 3 × 3
WEEK18 80% 4 × 4
Since there is a week of unloading after two heavy ones, we can safely apply this program both in the high volume period and in a period of physical chasing (Specific Hypertrophy).
To conclude:
By taking care of the details we can express the maximum potential of our body.
There are no deficient muscles, but only a profound difficulty in moving the weights.
If the pectoral muscles are the deficient muscle, then we must find the most suitable motor solution to use them. To improve in a district we must plan its improvement through technique.